So we are going to kind of be learning a little bit about sequencing today together. While I have learned about some of the basics of DNA sequencing, such as that of that’s its purpose is to essentially to read the DNA and determine which pattern or order, I guess, that the complementary base pairs form in order to code for genes within an organism, I have never learned much about difference ways or types of sequencing. So this is going to be more of a reflection of my knowledge of DNA sequencing.
So What is DNA Sequencing and How Does it Relate to my Starters?
DNA sequencing is essentially where scientists take samples of DNA from anywhere to determine how the four bases thymine, adenine, guanine, and cytosine are ordered within a DNA molecule and can then further use that information to determine numerous things regarding that portion of DNA including what organism that DNA is from as well as where certain genes are located. So what does that mean in relation to my starters? By using DNA sequencing, I could use that information to determine which species of yeasts or other micro organisms have found a home within my starter, allow us as research community make connections between which microbes result in specific phenotypes of our starters and then further use that imformation to discover which genes of the microbes result in those specific phenotypes and characteristics of my starters. This could allow us to possibly relate our fruit, the cucumber, certain relevant cultures to the fruit, and bead together in the future!
Sanger Versus NGS Sequencing
Lets first briefly discuss how Singer Sequencing works. First, a strand of DNA is cut up into small pieces and inserted into plasmid DNA, and then placed into bacterial cells that are given the time to multiply and create numerous copies of that strand of DNA. Once the bacteria has had the chance to multiply, the DNA is isolated from the bacteria and sent in to be sequenced. In the lab, a mixture of ingredients, free DNA bases, polymerase, terminator bases (light up), and primers is added to the DNA collected from the bacteria. In combination of that mixture with repeated heating and cooling, a reaction occurs that results in the formation of numerous fragments of different lengths of that DNA strand. Then, using electrophoresis, those DNA fragments are separated from shortest to longest and with the use of laser, recognize and read the terminator bases (the base at the end of the DNA fragment), record which base it is, and finally are able to look at the final result, the official DNA sequence.
Now lets briefly discuss how NGS works. NGS stand for Next Generation Sequencing and it is a technology that allows for the sequencing of many DNA strands at once, not just one like the Sanger Sequencing. In this type of DNA sequencing, DNA fragments are labeled, thus allowing for numerous DNA fragments to be mixed together; this is called ‘pooling’ and makes sequencing larger amounts of DNA fragments more cost effective and efficient. The information sequenced from the DNA fragments is recorded in libraries and can be recording in either or both direction (with each type of library recording the DNA fragments reflected in a different name).
While there are similarities between the two types of sequencing, with the NGS being able to almost place a ‘barcode’ on each DNA fragment, it has the ability to sequence large quantities of DNA fragments at one given time, making it as I said earlier more cost effective as well as efficient for one to get results back for as many as hundreds of thousands of DNA fragments sent in all at once. Another awesome benefit of using NGS is that it has greater sensitivity of variants of certain DNA fragments or genes as well a lower limit of detection.
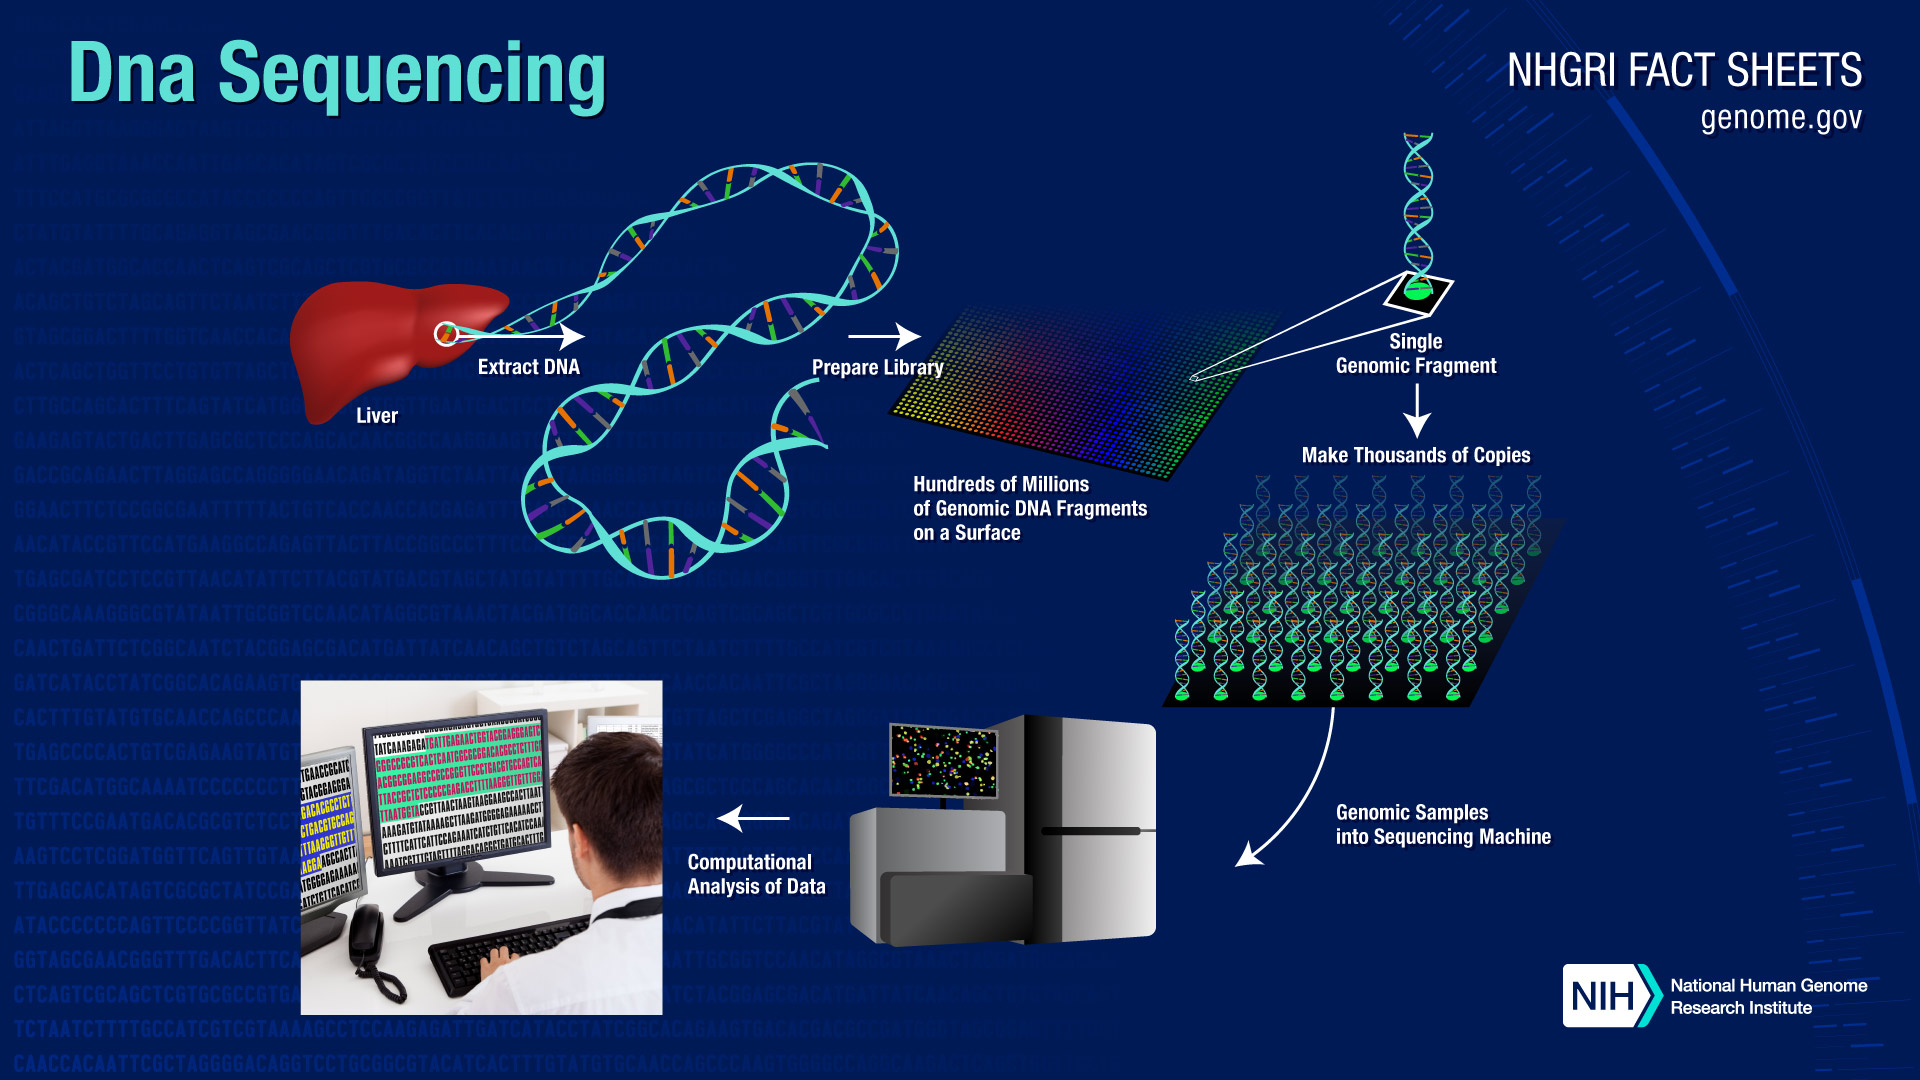
What Type of NGS are we Using For This Lab?
For this lab, we will be using the Illumina Sequencing Workflow to sequence the DNA from my starters. In order to prepare the samples or sequencing with this type of NGS, adapters are added to the ends of the fragments and over time, addition information is introduced to the ends of the DNA fragments of the DNA where the adapters were added. Then, after being placed into a flow tube, the fragments connect to complementary fragments attached to the bottom of the flow tube and are allowed to replicated, denature, form bridges, and then denature again to form two fragments connected to the bottom of the flow tube. This part of the process where more copies of the DNA fragments are generated is followed by the actual sequencing where light from a complementary bases attached to the DNA fragments attracts other bases to make copies of the DNA fragments. All of those washed away reads or copies of the fragments are then collected and once organized, can be used to identify genes of everything collected.
Okay, so that is what I gathered and believe that I understood from the video after watching it five or six times. Especially for the first two steps of the video, I did not understand a majority of the vocabulary that was used and it made it very difficult to understand how the DNA is prepared for sequencing. Other than the fact that adapters are added to the ends of the fragments in preparation for sequencing, I did not understand anything else really from that section of the process. In terms of the generation, sequencing, and analyzing section, the video went through the processes so quickly and again used so many words that I did not know that while I was able to grasp a general idea of how the fragments are replicated before being sequenced, and etc., I struggled to understand what was happening; the video did not go into depth of what was happening nor break it up enough for me to understand. I feel like I would need a step by step diagram of this information in order to even start truly comprehending and absorbing what happened during the video.
So all in all, the truth is, while I watched this video many times, I still struggle to understand what happened during it. I feel like I really need someone to dumb it down, create a vocab list for terms specific to the Illumina Sequencing Workflow as well as step by step images to go along with this video in order for me to truly understand it. I do not know if that is a bad thing, but I will continue to work at understand our sequencing process! Any help will be appreciated!